
Easily Build a Modern Job Listing Website with React, Vite, and Tailwind CSS
Easily Build a Modern Job Listing Website with React, Vite, and Tailwind CSS
Creating a modern, efficient and effective job listing website requires the use of up-to-date technology, such as React, Vite, and Tailwind CSS. In this article, we will guide you through setting up the development environment and creating a job listing website using these technologies.
I. Setting up the development environment
Before we begin, you will need to have Node.js and Vite installed on your computer. The installation process for these tools can be found on their respective documentation websites.
After we install the tools, we will create a new project using Vite by using the command below:
npm create vite@latestthen we will be given what library to use, here we will use react, so choose React and javascript.
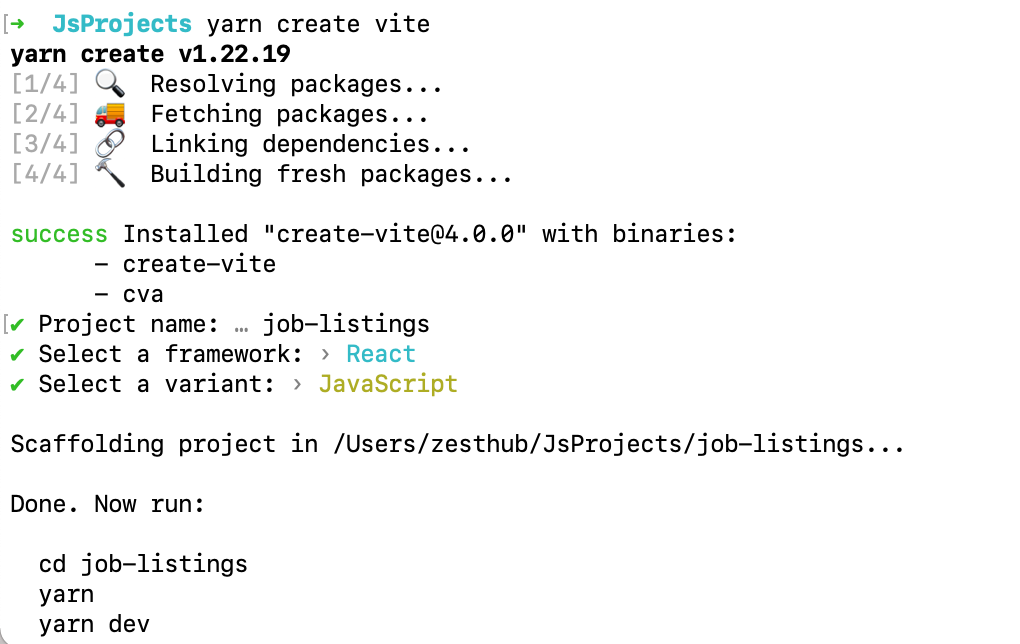
After successfully creating your React project, the next step is to install Tailwind CSS. Tailwind CSS is a utility-first CSS framework that allows for easy and efficient styling of your web application.
To install Tailwind CSS, you will need to run the following command in your project’s directory:
    npm install -D tailwindcss postcss autoprefixer

    npx tailwindcss init -p
After installing Tailwind CSS, the next step is configuring it to match your project’s design system. This can be done by editing the tailwind. config.cs file.
Here is an example of what the tailwind is. config.cs file might look like after being configured:
module.exports = {
  content: ["./index.html", "./src/**/*.{js,ts,jsx,tsx}"],
  theme: {
    extend: {},
  },
  plugins: [],
};
You can also import the CSS on your index.css file
@tailwind base;
@tailwind components;
@tailwind utilities;
after that the next step is will compile the js using the command below:
npm run devThat’s correct, after configuring Tailwind CSS and adding it to your project, the next step is to start building the components that you need for your job listing website.
II. Building the user interface
Here we will create a user interface using Tailwind CSS, before starting we define what components are in it:
- Header Component, we will create a component for the header along with the background image on the header. You can check the code below:
import Background from "./Background";

const Header = () => {
  return (
    <header className="bg-primary_dark_cyan mb-12 h-28 w-full">
      <Background />
    </header>
  );
};

export default Header;- Background Component, then we will create a background component to put the background image file for the header
const Background = () => {
  return (
    <img
      src="/assets/images/bg-header-desktop.svg"
      alt="background"
      className="flex h-full w-full items-center justify-center"
    />
  );
};

export default Background;- After the components to create the header have all been created, the next step is to create a component for the footer section. Here is the code for the footer component:
const Footer = () => {
  return (
    <div className="mx-auto flex max-w-7xl flex-col items-center justify-between p-10 sm:flex-row">
      <h1 className="text-dark_gray_cyan">
        Build by{" "}
        <a
          href="https://github.com/bangadam"
          className="text-primary_dark_cyan"
          target="_blank"
        >
          Muhammad Meganata Adam
        </a>
      </h1>
    </div>
  );
};

export default Footer;- We have done the Footer component, the next step is to create the job list component, there are two components that we will create in building the job list, namely JobList and JobCard. Here is the code of the JobList component:
import JobCard from "./JobCard";

const JobList = ({ jobs }) => {
  return (
    <div className="mx-auto max-w-7xl">
      <div className="flex flex-col">
        {jobs.map(job => (
          <JobCard job={job} key={job.id} />
        ))}
      </div>
    </div>
  );
};

export default JobList;
Explanation:
-
In the code, some data jobs props are useful for holding jobs data received from the App. jsx.
-
data jobs will be looped and call the JobBoard component in it so that we can display the job data.
- Job Card Component, kita akan membuat komponen untuk menampilkan informasi dari pekerjaan seperti gambar, judul, tools, informasi tanggal, tempat, dan bahasa pemrograman. Kodenya bisa kamu lihat dibawah ini:
const JobCard = ({ job, handleTagClick }) => {
  return (
    <div className="bg-white border-teal-500 mx-10 my-5 flex flex-col justify-between rounded-md border-solid p-6 shadow-md sm:flex-row">
      {/* company logo */}
      <img
        src={logo}
        alt="logo"
        className="-mt-11mb-4 h-20 w-20 sm:my-0 sm:mt-0 sm:h-24"
      />

      <div className="flex-flex-col-justify-between ml-4">
        {/* company name */}
        <h1 className="text-primary_dark_cyan flex items-center gap-2 py-2 text-lg">
          {company}
          {isNew && (
            <span className="bg-primary_dark_cyan text-white rounded-full px-3 text-base">
              New!
            </span>
          )}
          {isFeatured && (
            <span className="bg-gray-700 text-white rounded-xl px-3 text-base">
              Featured
            </span>
          )}
        </h1>

        {/* job position */}
        <h1 className="cursor-pointer text-xl font-bold">{position}</h1>

        {/* job info */}
        <p className="text-dark_gray_cyan flex items-center gap-2 text-base">
          {postedAt} • {contract} • {location}
        </p>
      </div>
      {/* Job tags */}
      <div className="border-gray-500 mx-4 mt-4 flex flex-wrap items-center border-t border-solid pt-4 sm:ml-auto sm:border-0 sm:pt-0">
        {tags.map(tag => (
          <button className="text-primary_dark_cyan bg-light_grayish_cyan_filter_pill mb-4 mr-4 rounded p-2 font-bold sm:mb-0">
            {tag}
          </button>
        ))}
      </div>
    </div>
  );
};

export default JobCard;
Finally, we have created several components that we need in building the UI of the job listing website, the next step is that we will create the data and functionality to display the job data.
III. Adding functionality
1. Preparing data
In the first step we will prepare the job list data by entering it into a JSON file called data.json, here are the contents of the data.
[
  {
    "id": 1,
    "company": "Photosnap",
    "logo": "assets/images/photosnap.svg",
    "isNew": true,
    "featured": true,
    "position": "Senior Frontend Developer",
    "role": "Frontend",
    "level": "Senior",
    "postedAt": "1d ago",
    "contract": "Full Time",
    "location": "USA Only",
    "languages": ["HTML", "CSS", "JavaScript"],
    "tools": []
  },
  {
    "id": 2,
    "company": "Manage",
    "logo": "assets/images/manage.svg",
    "isNew": true,
    "featured": true,
    "position": "Fullstack Developer",
    "role": "Fullstack",
    "level": "Midweight",
    "postedAt": "1d ago",
    "contract": "Part Time",
    "location": "Remote",
    "languages": ["Python"],
    "tools": ["React"]
  },
  {
    "id": 3,
    "company": "Account",
    "logo": "assets/images/account.svg",
    "isNew": true,
    "featured": false,
    "position": "Junior Frontend Developer",
    "role": "Frontend",
    "level": "Junior",
    "postedAt": "2d ago",
    "contract": "Part Time",
    "location": "USA Only",
    "languages": ["JavaScript"],
    "tools": ["React", "Sass"]
  },
  {
    "id": 4,
    "company": "MyHome",
    "logo": "assets/images/myhome.svg",
    "isNew": false,
    "featured": false,
    "position": "Junior Frontend Developer",
    "role": "Frontend",
    "level": "Junior",
    "postedAt": "5d ago",
    "contract": "Contract",
    "location": "USA Only",
    "languages": ["CSS", "JavaScript"],
    "tools": []
  },
  {
    "id": 5,
    "company": "Loop Studios",
    "logo": "assets/images/loop-studios.svg",
    "isNew": false,
    "featured": false,
    "position": "Software Engineer",
    "role": "Fullstack",
    "level": "Midweight",
    "postedAt": "1w ago",
    "contract": "Full Time",
    "location": "Worldwide",
    "languages": ["JavaScript"],
    "tools": ["Ruby", "Sass"]
  },
  {
    "id": 6,
    "company": "FaceIt",
    "logo": "assets/images/faceit.svg",
    "isNew": false,
    "featured": false,
    "position": "Junior Backend Developer",
    "role": "Backend",
    "level": "Junior",
    "postedAt": "2w ago",
    "contract": "Full Time",
    "location": "UK Only",
    "languages": ["Ruby"],
    "tools": ["RoR"]
  },
  {
    "id": 7,
    "company": "Shortly",
    "logo": "assets/images/shortly.svg",
    "isNew": false,
    "featured": false,
    "position": "Junior Developer",
    "role": "Frontend",
    "level": "Junior",
    "postedAt": "2w ago",
    "contract": "Full Time",
    "location": "Worldwide",
    "languages": ["HTML", "JavaScript"],
    "tools": ["Sass"]
  },
  {
    "id": 8,
    "company": "Insure",
    "logo": "assets/images/insure.svg",
    "isNew": false,
    "featured": false,
    "position": "Junior Frontend Developer",
    "role": "Frontend",
    "level": "Junior",
    "postedAt": "2w ago",
    "contract": "Full Time",
    "location": "USA Only",
    "languages": ["JavaScript"],
    "tools": ["Vue", "Sass"]
  },
  {
    "id": 9,
    "company": "Eyecam Co.",
    "logo": "assets/images/eyecam-co.svg",
    "isNew": false,
    "featured": false,
    "position": "Full Stack Engineer",
    "role": "Fullstack",
    "level": "Midweight",
    "postedAt": "3w ago",
    "contract": "Full Time",
    "location": "Worldwide",
    "languages": ["JavaScript", "Python"],
    "tools": ["Django"]
  },
  {
    "id": 10,
    "company": "The Air Filter Company",
    "logo": "assets/images/the-air-filter-company.svg",
    "isNew": false,
    "featured": false,
    "position": "Front-end Dev",
    "role": "Frontend",
    "level": "Junior",
    "postedAt": "1mo ago",
    "contract": "Part Time",
    "location": "Worldwide",
    "languages": ["JavaScript"],
    "tools": ["React", "Sass"]
  }
]
2. Add state to App. jsx
Next, we will create a new state in the App. jsx component and compose the UI component that we have previously created. Here is the complete code:
import { useEffect, useState } from "react";
import "./App.css";
import Footer from "./components/Footer/Footer";
import Header from "./components/Header/Header";
import JobList from "./components/Main/JobList";
import data_jobs from "./data/data.json";

function App() {
  const [jobs, setJobs] = useState([]);
  const [filters, setFilters] = useState([]);

  useEffect(() => setJobs(data_jobs));

  // filter function
  const filterFunc = ({ role, level, tools, languages }) => {
    if (filters.length === 0) {
      return true;
    }

    const tags = [role, level];

    return tags.some(tag => filters.includes(tag));
  };

  const filteredJobs = jobs.filter(filterFunc);

  return (
    <div className="min-h-screen w-full">
      {/* Header component here */}
      <Header />
      <div className="mx-auto max-w-7xl">{/* use filter function here */}</div>

      {/* joblist component here */}
      <JobList filteredJobs={filteredJobs} />
      {/* Footer component here */}
      <Footer />
    </div>
  );
}

export default App;
Explanations
-
there is a job state which is useful for holding job list data.
-
there is a state called filters, which is useful for holding data in the form of tools, languages, level, and role information from job information. Then the data is filtered using the filterFunc function.
-
The state that has been created will be inserted into the JobList component with the props name filteredJobs.
3. Display job details and tags in JobCard.jsx
In this step, we will try to display job information and tags sent through props from the App. jsx, so add a few pieces of code to the JobCard component as below:
const JobCard = ({ job, handleTagClick }) => {
  const {
    company,
    logo,
    isNew,
    isFeatured,
    position,
    role,
    level,
    postedAt,
    contract,
    location,
    languages,
    tools,
  } = job;

  const tags = [role, level];

  if (tools) {
    tags.push(...tools);
  }

  if (languages) {
    tags.push(...languages);
  }

  return (
    <div className="bg-white border-teal-500 mx-10 my-5 flex flex-col justify-between rounded-md border-solid p-6 shadow-md sm:flex-row">
      {/* company logo */}
      <img
        src={logo}
        alt="logo"
        className="-mt-11mb-4 h-20 w-20 sm:my-0 sm:mt-0 sm:h-24"
      />

      <div className="flex-flex-col-justify-between ml-4">
        {/* company name */}
        <h1 className="text-primary_dark_cyan flex items-center gap-2 py-2 text-lg">
          {company}
          {isNew && (
            <span className="bg-primary_dark_cyan text-white rounded-full px-3 text-base">
              New!
            </span>
          )}
          {isFeatured && (
            <span className="bg-gray-700 text-white rounded-xl px-3 text-base">
              Featured
            </span>
          )}
        </h1>

        {/* job position */}
        <h1 className="cursor-pointer text-xl font-bold">{position}</h1>

        {/* job info */}
        <p className="text-dark_gray_cyan flex items-center gap-2 text-base">
          {postedAt} • {contract} • {location}
        </p>
      </div>
      {/* Job tags */}
      <div className="border-gray-500 mx-4 mt-4 flex flex-wrap items-center border-t border-solid pt-4 sm:ml-auto sm:border-0 sm:pt-0">
        {tags.map(tag => (
          <button className="text-primary_dark_cyan bg-light_grayish_cyan_filter_pill mb-4 mr-4 rounded p-2 font-bold sm:mb-0">
            {tag}
          </button>
        ))}
      </div>
    </div>
  );
};

export default JobCard;
4. Processing job props in JobList.jsx
The last step is that change the code in the JobList.jsx file to be like this to display job data using looping:
import JobCard from "./JobCard";

const JobList = ({ handleTagClick, filteredJobs }) => {
  return (
    <div className="mx-auto max-w-7xl">
      <div className="flex flex-col">
        {filteredJobs.map(job => (
          <JobCard job={job} key={job.id} />
        ))}
      </div>
    </div>
  );
};

export default JobList;
After we have created several functions to process data using state, the last step is that we will run the project by :
npm run devThen the display of our code will be as below:
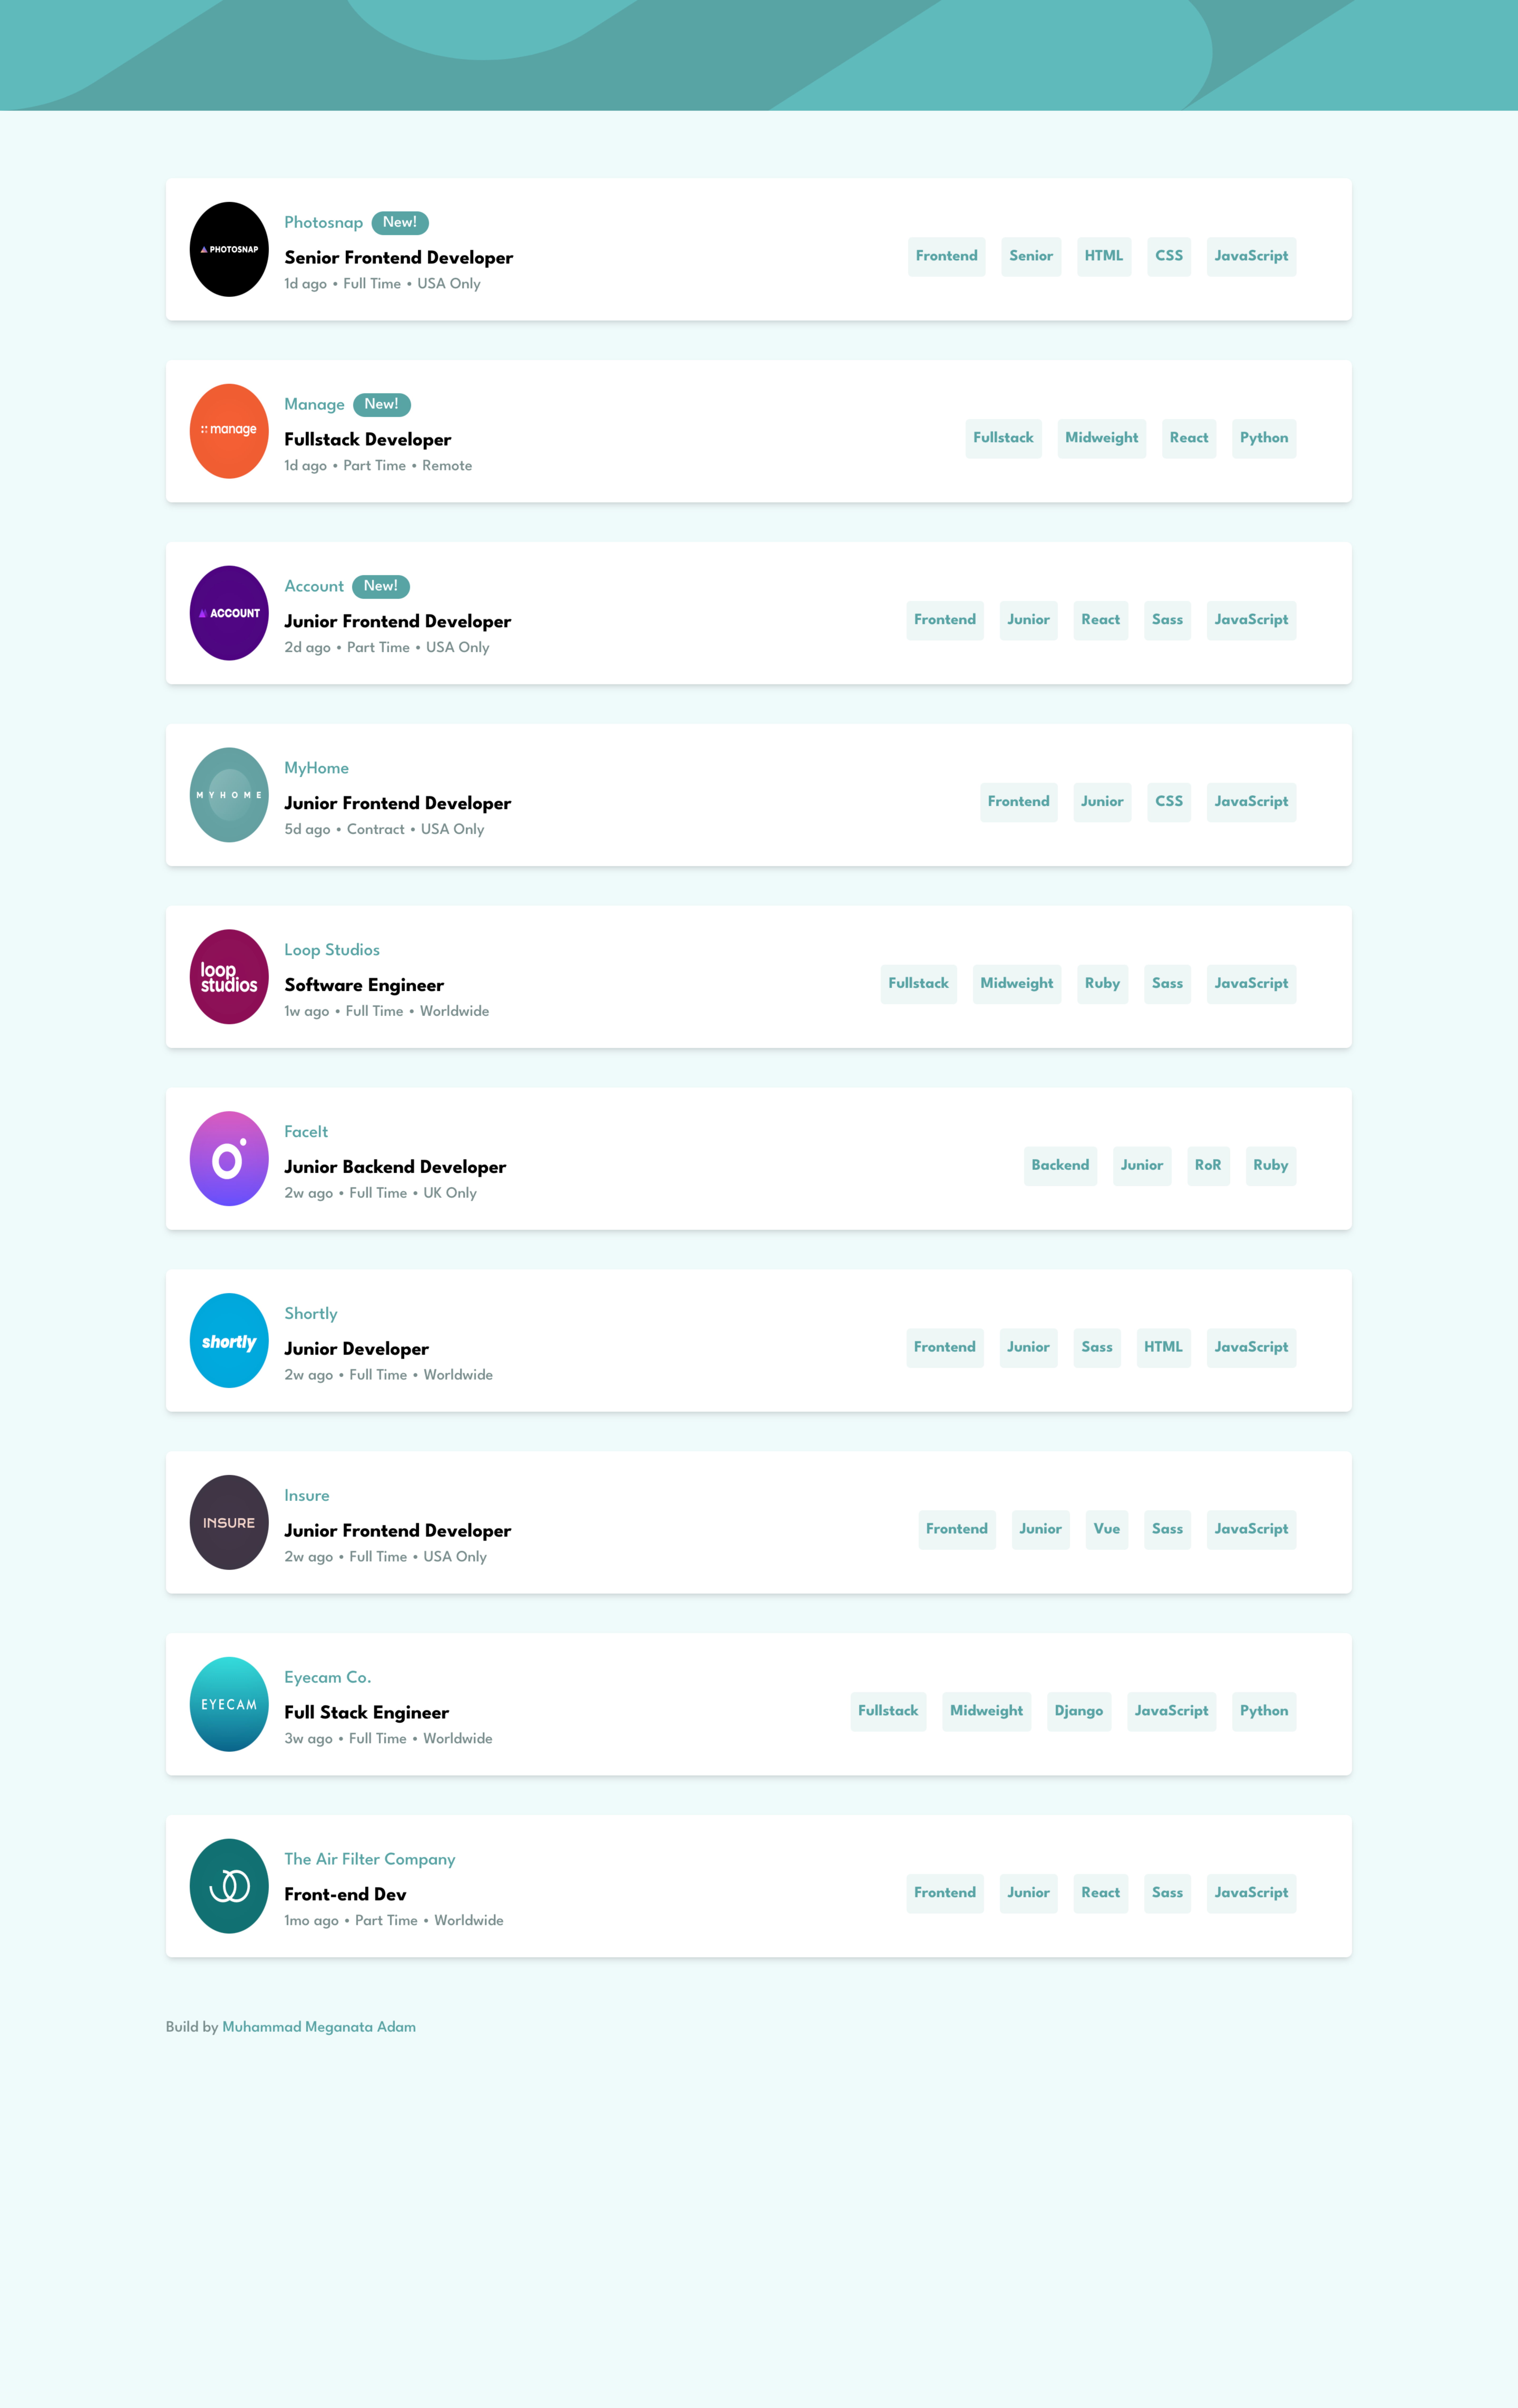
Congratulations, we can finally create a job listing website using React, Vite, and TailwindCss. The next step is to deploy it on the server so that the website that we will create can be seen by many people.
IV. Conclusion
By following the steps outlined in this article, you should now have a solid understanding of how to set up a development environment for building a job listing website using React, Vite, and Tailwind CSS.
You’ve learned how to use React with Vite and Tailwind CSS as the CSS superset. We also learned how to create a component in React and use state data to store information about job listings. You also can see the complete code on the provided Github repository https://github.com/bangadam/job-listing-react-vite-tailwind
It’s important to remember that this is just a basic guide and there’s still a lot more that you can do with these technologies. I would recommend you explore the documentation of the tools and libraries you’ve used and try building a more complex app.
If you run into any issues or have questions about the code or process, you can refer to the GitHub repository or reach out for help. Good luck building your job listing website!
Thanks For Reading!
Available for a new project! Let’s talk: Email: bangadam.dev@gmail.com Linkedin: https://www.linkedin.com/in/bangadam