
How to build a calculator app using React Native A Step-by-Step Tutorial
How to Build a Calculator App Using React Native: A Step-by-Step Tutorial

The calculator application is a simple application that is always available on every device such as android, ios, and desktops. In this article we will build a calculator application using React Native and Expo, why do we use React Native and Expo?
React Native is a JavaScript-based framework that is used to develop mobile applications on two operating systems simultaneously, namely Android and iOS. React Native itself was first launched in 2015 by Facebook and is open source.
You can find out more information about React Native here
Expo itself is a set of tools, libraries, and services that are used to simplify the code of React Native apps. So you can run React Native apps on the Expo emulator.
You can find out more information about Expo here.
maybe that’s enough about the introduction of React Native and Expo. Before we start making a calculator application, first install node js, react native, and expo on your computer.
Prerequisite
-
Install node js, you can see how to install it here
-
React Native, you can see the installation documentation here
-
Expo, you can see the installation documentation here
Step 1: Create New Project
The first step is to create a new project using the Expo CLI to create the React Native code base with the following command:
$ expo init calculator-appthen we will be given the choice of starting the project we want, here we choose the blank option and use Javascript as below:

after that the process will continue by downloading all the dependencies.
Step 2: Create Button Component
In the process of developing applications using React Native, it is important to pay attention to breaking down UI components into small components so that the component code that we create can be reusable. First, create a new folder called “components” to store our component code, the first component we will create is Button, create a new file called Button.js. Here is the source code for the Button component:
import { Dimensions, StyleSheet, Text, TouchableOpacity } from "react-native";

export default ({ onPress, text, size, theme }) => {
  const buttonStyles = [styles.button];
  const textStyles = [styles.text];

  if (size === "double") {
    buttonStyles.push(styles.buttonDouble);
  }

  if (theme === "secondary") {
    buttonStyles.push(styles.buttonSecondary);
    textStyles.push(styles.textSecondary);
  } else if (theme === "accent") {
    buttonStyles.push(styles.buttonAccent);
  }

  return (
    <TouchableOpacity onPress={onPress} style={buttonStyles}>
      <Text style={textStyles}>{text}</Text>
    </TouchableOpacity>
  );
};
explanation :
-
in line 3 there are four props that we need in making this Button component, namely: onPress, text, size and theme
-
each of the props has a function like onPress for handling actions on buttons.
-
The button component that we created has 2 types of themes, namely secondary and accent, and 1 size, namely double.
-
the button component uses the default React Native component, TouchableOpacity
after we make the code from the component don’t forget to make the styling code from this button component. Here is the code for the component’s button styling:
// set dimmenstion
const screen = Dimensions.get("window");
const buttonWidth = screen.width / 4;

const styles = StyleSheet.create({
  button: {
    backgroundColor: "#333333",
    flex: 1,
    height: Math.floor(buttonWidth - 10),
    alignItems: "center",
    justifyContent: "center",
    borderRadius: Math.floor(buttonWidth),
    margin: 5,
  },
  text: {
    color: "#fff",
    fontSize: 24,
  },
  textSecondary: {
    color: "#060606",
  },
  buttonDouble: {
    width: screen.width / 2 - 10,
    flex: 0,
    alignItems: "flex-start",
    paddingLeft: 40,
  },
  buttonSecondary: {
    backgroundColor: "#a6a6a6",
  },
  buttonAccent: {
    backgroundColor: "#ffc107",
  },
});
so the complete code of our button component is as follows:
import { Dimensions, StyleSheet, Text, TouchableOpacity } from "react-native";

export default ({ onPress, text, size, theme }) => {
  const buttonStyles = [styles.button];
  const textStyles = [styles.text];

  if (size === "double") {
    buttonStyles.push(styles.buttonDouble);
  }

  if (theme === "secondary") {
    buttonStyles.push(styles.buttonSecondary);
    textStyles.push(styles.textSecondary);
  } else if (theme === "accent") {
    buttonStyles.push(styles.buttonAccent);
  }

  return (
    <TouchableOpacity onPress={onPress} style={buttonStyles}>
      <Text style={textStyles}>{text}</Text>
    </TouchableOpacity>
  );
};

// set dimmenstion
const screen = Dimensions.get("window");
const buttonWidth = screen.width / 4;

const styles = StyleSheet.create({
  button: {
    backgroundColor: "#333333",
    flex: 1,
    height: Math.floor(buttonWidth - 10),
    alignItems: "center",
    justifyContent: "center",
    borderRadius: Math.floor(buttonWidth),
    margin: 5,
  },
  text: {
    color: "#fff",
    fontSize: 24,
  },
  textSecondary: {
    color: "#060606",
  },
  buttonDouble: {
    width: screen.width / 2 - 10,
    flex: 0,
    alignItems: "flex-start",
    paddingLeft: 40,
  },
  buttonSecondary: {
    backgroundColor: "#a6a6a6",
  },
  buttonAccent: {
    backgroundColor: "#ffc107",
  },
});
Step 3: Create Row Component
The component that we will create is a Row component, this component is useful for creating rows when we want to process layouts. Here is the code for the Row component and its styling code:
import { StyleSheet, View } from "react-native";

const Row = ({ children }) => {
  return <View style={styles.container}>{children}</View>;
};

// create styles of Row
const styles = StyleSheet.create({
  container: {
    flexDirection: "row",
  },
});

export default Row;
explanation:
-
in the row component, there is 1 prop that we need, namely: children
-
the row component uses the default View component from React Native
-
added flexDirection: “row” in this styling is used to make the layout row
Step 4: Create calculator logic
Create a new folder called util and a new file calculator.js, here we will create a function logic in the calculator application which we will implement later in the **App.js **file, here is the complete code:
export const initialState = {
  currentValue: "0",
  operator: null,
  previousValue: null,
};

export const handleNumber = (value, state) => {
  if (state.currentValue === "0") {
    return { currentValue: `${value}` };
  }

  return {
    currentValue: `${state.currentValue}${value}`,
  };
};

const handleEqual = state => {
  const { currentValue, previousValue, operator } = state;

  const current = parseFloat(currentValue);
  const previous = parseFloat(previousValue);
  const resetState = { operator: null, previousValue: null };

  switch (operator) {
    case "+":
      return {
        currentValue: `${previous + current}`,
        ...resetState,
      };
    case "-":
      return {
        currentValue: `${previous - current}`,
        ...resetState,
      };
    case "*":
      return {
        currentValue: `${previous * current}`,
        ...resetState,
      };
    case "/":
      return {
        currentValue: `${previous / current}`,
        ...resetState,
      };

    default:
      return state;
  }
};

// calculator function
const calculator = (type, value, state) => {
  switch (type) {
    case "number":
      return handleNumber(value, state);
    case "clear":
      return initialState;
    case "posneg":
      return {
        currentValue: `${parseFloat(state.currentValue) * -1}`,
      };
    case "percentage":
      return {
        currentValue: `${parseFloat(state.currentValue) * 0.01}`,
      };
    case "operator":
      return {
        operator: value,
        previousValue: state.currentValue,
        currentValue: "0",
      };
    case "equal":
      return handleEqual(state);
    default:
      return state;
  }
};

export default calculator;
explanation :
-
initialState is used to give the default value to our calculator app
-
function handleNumber serves to return the value of the calculator, and has 2 props namely value and state
-
function handle Equal serves to process the set value of each mathematical operator and returns its value.
-
function calculator serves to validate every given operator such as if the number will call the handleNumber function if it is clear it will return the default state value from initiaState etc.
Step 5: Refactor App.js
After we have created all the components and the logic process, the next step is to make adjustments to the code in the App.js file. Here is the full code:
import React, { Component } from "react";
import { SafeAreaView, StyleSheet, Text, View } from "react-native";
import Button from "./components/Button";
import Row from "./components/Row";
import calculator, { initialState } from "./util/calculator";

// create class component of App
export default class App extends Component {
  state = initialState;

  // handle tap method
  HandleTap = (type, value) => {
    this.setState(state => calculator(type, value, state));
  };

  // render method
  render() {
    return (
      <View style={styles.container}>
        {/* Status bae here */}
        <SafeAreaView>
          <Text style={styles.value}>
            {parseFloat(this.state.currentValue).toLocaleString()}
          </Text>

          {/* Do create componentRow */}
          <Row>
            <Button
              text="C"
              theme="secondary"
              onPress={() => this.HandleTap("clear")}
            />

            <Button
              text="+/-"
              theme="secondary"
              onPress={() => this.HandleTap("posneg")}
            />

            <Button
              text="%"
              theme="secondary"
              onPress={() => this.HandleTap("percentage")}
            />

            <Button
              text="/"
              theme="accent"
              onPress={() => this.HandleTap("operator", "/")}
            />
          </Row>

          {/* Number */}
          <Row>
            <Button text="7" onPress={() => this.HandleTap("number", 7)} />
            <Button text="8" onPress={() => this.HandleTap("number", 8)} />
            <Button text="9" onPress={() => this.HandleTap("number", 9)} />
            <Button
              text="X"
              theme="accent"
              onPress={() => this.HandleTap("operator", "*")}
            />
          </Row>

          <Row>
            <Button text="5" onPress={() => this.HandleTap("number", 5)} />
            <Button text="6" onPress={() => this.HandleTap("number", 6)} />
            <Button text="7" onPress={() => this.HandleTap("number", 7)} />
            <Button
              text="-"
              theme="accent"
              onPress={() => this.HandleTap("operator", "-")}
            />
          </Row>

          <Row>
            <Button text="1" onPress={() => this.HandleTap("number", 1)} />
            <Button text="2" onPress={() => this.HandleTap("number", 2)} />
            <Button text="3" onPress={() => this.HandleTap("number", 3)} />
            <Button
              text="+"
              theme="accent"
              onPress={() => this.HandleTap("operator", "+")}
            />
          </Row>

          <Row>
            <Button text="0" onPress={() => this.HandleTap("number", 0)} />
            <Button text="." onPress={() => this.HandleTap("number", ".")} />
            <Button
              text="="
              theme="primary"
              onPress={() => this.HandleTap("equal", "=")}
            />
          </Row>
        </SafeAreaView>
      </View>
    );
  }
}

// create styles of app
const styles = StyleSheet.create({
  container: {
    flex: 1,
    backgroundColor: "#202020",
    justifyContent: "flex-end",
  },
  value: {
    color: "#fff",
    fontSize: 42,
    textAlign: "right",
    marginRight: 20,
    marginBottom: 10,
  },
});
explanation:
-
handleTap is a function that we created which aims to provide state values and call utils/calculator.
-
here we call two components, namely Button and Row to design the appearance of the calculator such as numbers, mathematical operations, and the calculation process.
Step 6: Running App
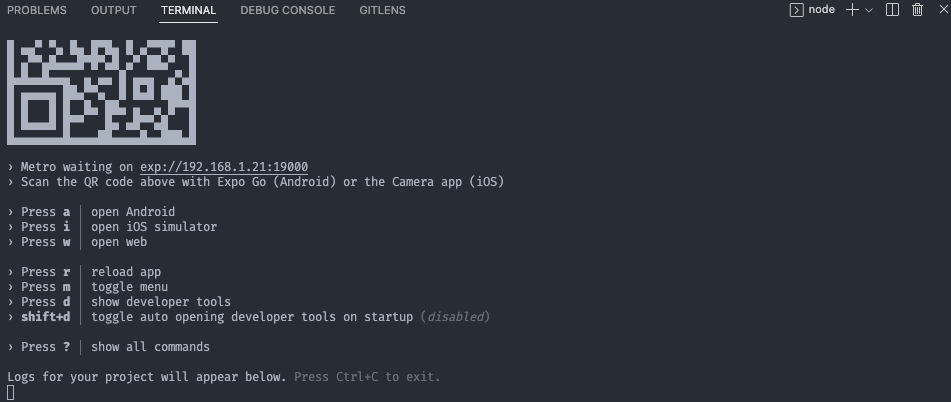
In this step we will try to run the calculator application on the device or can use an emulator, here I use the iPhone simulator from MacOS. Run the command below to run the program:
$ yarn iosThe running process here uses Expo as shown below:
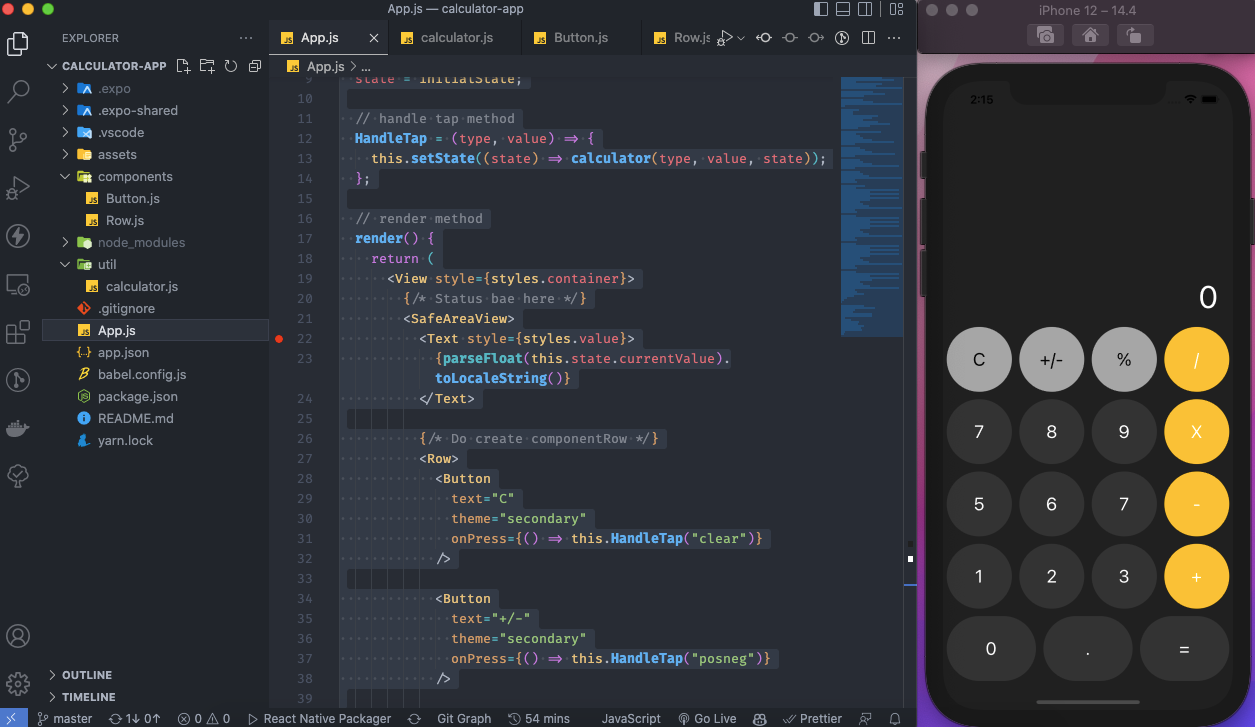
if the compiling process is complete then the display of the calculator application that we programmed earlier will be like this:
Conclusion
That’s enough for this article, so far you already know about styling, components, props, and states in React Native. If you need the full source code, you can visit my Github repository here https://github.com/bangadam/calculator-app
Thanks For Reading!
Available for a new project! Let’s have a talk : Email: bangadam.dev@gmail.com Linkedin: https://www.linkedin.com/in/bangadam